Backend in a Box: Strapi (tutorial)
Do you want to set up a backend FAST? I mean, before your coffee gets cold kind of fast? Then boy howdy do I have a solution for you! Allow me the pleasure of introducing Strapi, the headless CMS. In this first Strapi tutorial we’re going to set up the whole thing from local to live in just shy of 20 minutes*.
So just what is a headless CMS anyway? Well, it’s like a WordPress admin panel for your backend / API that also handles authentication. Additionally, Strapi lets you setup your database structure (for the most part) without actually having to write any backend /DB queries, and then once it’s setup it has loads of customization. You might be saying to yourself “Okay, that sounds expensive.” Nope! Strapi is 100% open source and all the other services were going to be using will be under the free amount allotment. Before we can skydive right into the Strapi tutorial, we’re going to need to do some setting up!
*20 minutes not including downloadin
Setup!
You’re going to need to have installed and signed up for a few things first if you haven’t already. Let’s make a list of them:
- Sign up for a Heroku account and install the CLI / sign in
- MongoDB locally installed
- Sign up for Mongo Atlas. You’ll need to create a new project and cluster later.
- Install Node.js and make sure it’s in your path
- Install Git, make sure it’s in your path, and make sure you’re signed into Github in your terminal / command prompt / git bash / or whatever you’re using (for safety’s sake)
- Yarn (for this tutorial)
Now that you’ve set it up, let’s knock it down! Step by step process to commence… now.
- Make a new directory somewhere you want your api to live.
cdinto it in your shell (just going to call it shell, but windows CLIs are fine too). - When you’re in it, run
yarn create strapi-app .this will ask you if you want to do it the auto way or the manual way, choose manual. If you’re using Git Bash the arrows might seem like they’re not working, but just arrow down to the options and you’ll be alright. - Choose Mongo for your DB, select whatever the default is for everything else except SSL which you should choose no. Let it do it’s magic.
- Check out your new local strapi app! Run
yarn developin your console, then go to localhost:3000/admin Fill out the info there and if you’ve successfully set it up, you should see something like this:

- Go to https://www.mongodb.com/cloud/atlas and sign in. Go to your projects and create a new project. Select free tier for everything. Create a new cluster. While it’s loading, go to database access and create a user that has read/write access. Go to Network Access, click “add IP address” and choose “whitelist my ip” option , save, then the “whitelist everywhere” option and save. Your cluster is probably available now, so go to it and click on “connect”. For node drivers choose “2.2.12 or later” and grab that connection string. Replace the below with your connection string including username + pass for it.
{
  "defaultConnection": "default",
  "connections": {
    "default": {
      "connector": "mongoose",
      "settings": {
        "uri": "mongodb://yourusername:yourpassword@strapidbexample-fxxx6c.mongodb.net:27017,strapidatabase-shard-00-01-fxxxc.mongodb.net:27017,strapidatabase-shard-00-02-fxxxc.mongodb.net:27017/test?ssl=true&replicaSet=strapidatabase-shard-0&authSource=admin&retryWrites=true&w=majority"
      },
      "options": {
        "ssl": true
      }
    }
  }
}
Copy and paste the above code with your Atlas connection string into config > environments > development > database.json and config > environments > production> database.json Strapi will bounce you (if you’re connected) and ask you to create a new admin user. Fill it out again.
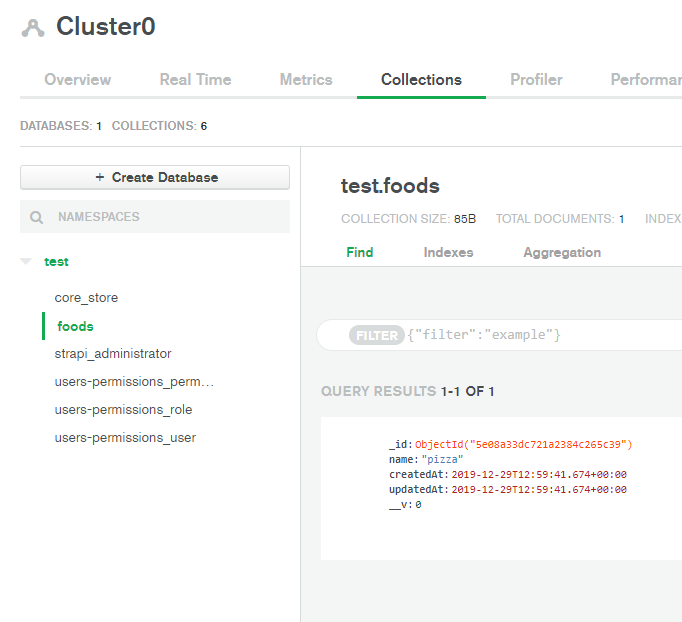
To be sure everything is correct, Create a Content Type in your Strapi app. I’m going to call mine food and give it one field of name. Make sure to click save in the top right hand corner of the content type builder, let the server restart, then add an entry through the new category “Foods” (Strapi capitalizes and pluralizes automatically in the app). Add new Food, name it ‘pizza’ and save. Now in Atlas in clusters > collections you should see Foods with pizza and an id/create time/etc.
Okay! So our Strapi App is now half cloud based. Let’s make it fully cloud based! git init the directory then git add . then git commit -m "init commit". Git is now on the board. Heroku-ify it with heroku create deploy it with git push heroku master. When it’s done deploying, you can find the address with heroku info. Don’t forget to go to that site /admin and sign in with the same credentials you were using before with your strapi app (after it asked you again during the DB source switch).
If everything went to plan, you now have a fully usable API / DB / auth provider! Mission Complete!*
*Well kind of, but not really. Let’s quickly go into some caveats of Strapi. One thing you should know is that even though it looks like the app running online is the same as the local one it is not, at least in regards to functionality. You can only add new permission types and content builder types on your local build. This means that you’ll need to push every time you want a change to be live.
Secondly, allowing access to your DB from everywhere is not a good practice. It’d be better to whitelist on your IP address and the server the app is sitting on, but heroku doesn’t have static IPs for it’s dynamos. This is where either running a proxy like fixie, or going with a different provider would be better from a security perspective. Setting this up would go way over the 20 minute estimate of this Strapi tutorial, so if there’s interest, we can set those up later!
Recent Comments